




73 Slack messages, four versions of the same spreadsheet, and a Google Doc that nobody has touched in three weeks: that is what daily work looks like in many small teams right before they finally switch to a new tool. This is exactly where Notion for teams comes in, not as another chat app, but as the central place where documentation, tasks and project status all come together.
This article is the first part of a four-part series on setting up Notion for teams the right way. It shows how a sensible workspace structure comes together, how databases and wikis work, and how to build your first project board in just a few steps.
Table of Contents
Key Takeaways
- Notion for teams combines documents, tables and task management in one connected environment instead of separate tools.
- Teamspaces work like mini-workspaces with their own members and permissions, Notion recommends no more than three of them to keep navigation clear.
- Databases can be displayed as a table, Kanban board or calendar, the same data, different views depending on the task.
- A well thought-out permissions setup prevents sensitive content from accidentally becoming visible to the entire company.
- The best practical entry point is a simple project tracking board, before building more complex structures.
What is Notion, and why do teams switch to it?
At its core, Notion is a flexible workspace that combines text pages, databases and simple automations. Instead of using a separate tool for every task, Google Docs for text, Excel for lists, Slack for chat, Notion bundles these functions into one interface. A task list can sit right next to a project description, a meeting note can be linked directly to its related task.
For teams that have so far worked with scattered tools, the biggest shift isn’t learning the interface, it’s learning to think in pages and databases instead of files. A Notion page can contain text, embedded tables, checklists and sub-pages all at once, and all of it can be edited in real time with other team members.
Notion itself describes the recommended starting sequence as a clear order: first set up a company wiki, then create teamspaces for individual departments, and only after that introduce the core databases for projects, tasks and knowledge. This order isn’t arbitrary, it prevents teams from jumping into complex databases too early, before the basic structure is in place.
Workspace structure for Notion teams: teamspaces instead of folder chaos
The central building block for Notion for teams is the so-called teamspace. A teamspace works like its own mini-workspace inside the main workspace, with its own member list and its own permissions. Instead of one giant folder tree that eventually nobody can navigate, you get clearly separated areas per department.
Notion recommends a simple basic structure:
- A “General” teamspace for company-wide content such as mission, values, general meeting notes and announcements.
- One or two department teamspaces, for example for marketing or engineering, where department-specific work happens.
Important: even large companies shouldn’t create more than three default teamspaces that automatically include every employee. Anything beyond that should be set up as an optional teamspace that employees join voluntarily when it’s relevant to their role.
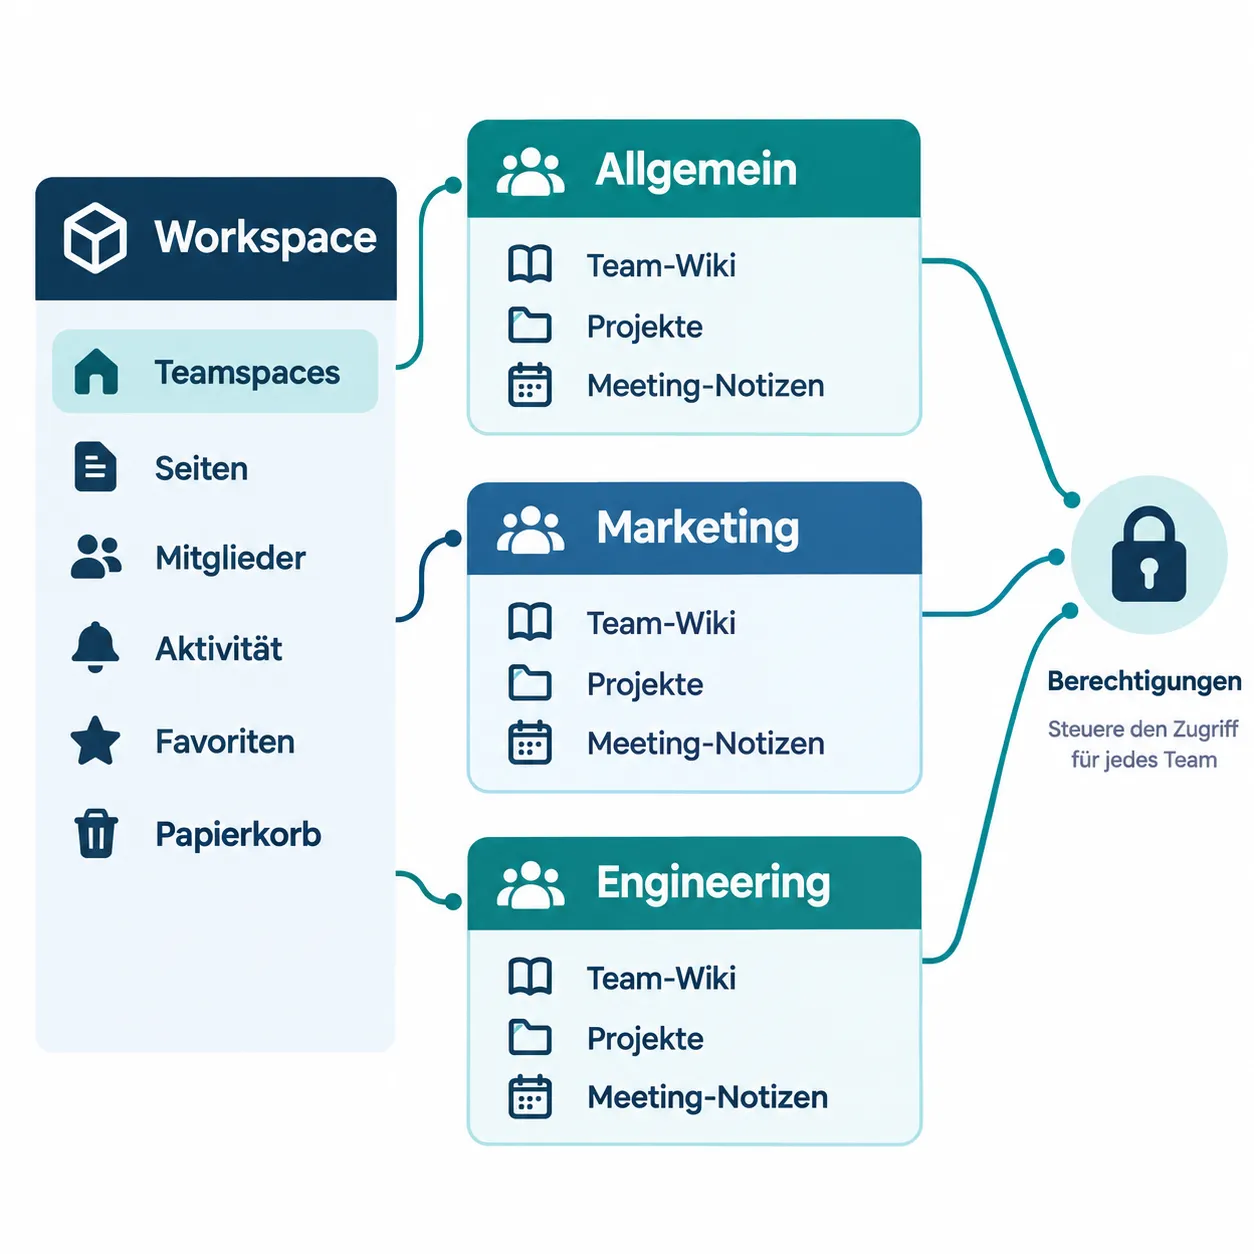
Shared spaces vs. private areas
Besides teamspaces, Notion for teams has two additional levels:
| Area | Visibility | Typical content |
|---|---|---|
| Teamspace | All members of the teamspace | Projects, team wiki, shared databases |
| Shared page | Individually specified people | Cross-departmental projects |
| Private page | Creator only | Personal notes, drafts |
This three-tier separation is the real replacement for the old chaos of private Google Docs links and Slack DMs: information lands in the right visibility zone from the start instead of ending up somewhere random.
In practice, the best way to get started is with templates. Notion recommends creating top-level pages in new teamspaces from pre-built templates before inviting further members, for example using the “Team Workspace Second Brain” template, which brings together projects, documentation and processes in one structure. This prevents new members from landing in a completely empty workspace.
Database basics: tables, Kanban and calendar from one source
Databases are the heart of Notion for teams, and the biggest difference from classic spreadsheets. A Notion database stores entries once but displays them in multiple views at the same time. That means a project plan, a task list and an editorial calendar can all be based on the same data, without maintaining a second version anywhere.
The three most important views to get started with:
Table view
Works like a classic spreadsheet with columns and rows. Ideal for overviews with lots of detail, for example a list of all client projects with status, owner and deadline.
Kanban board view
Shows the same entries as cards in columns, usually sorted by status (“Open”, “In progress”, “Done”). This view works especially well for teams that think visually and want to see progress at a glance.
Calendar view
Arranges entries by date, useful for editorial calendars, deadlines or meeting series.
The key benefit: if a status changes in the Kanban view, the table view and calendar view of the same database update automatically too.
On top of that, since the 2026 updates there are pre-built relational databases like the People Directory, which shows everyone in the workspace and can be imported from HR systems. These directories can be linked directly to project and task databases, for example to see who currently has how many open tasks.
Wiki pages for team documentation
Alongside databases, wiki pages are the second core building block of Notion for teams. A wiki replaces the loose collection of Google Docs, PDF attachments in Slack and outdated onboarding emails with a single, searchable structure.
Typical structure of a team wiki:
- Home page with links to the most important sub-pages
- Department-specific documentation inside the relevant teamspace
- Process descriptions linked directly to related task databases
- A glossary or FAQ section for recurring questions
New pages are created simply via the plus icon inside the teamspace, either completely from scratch or with AI assistance, which significantly speeds up onboarding for teams without much technical experience. Since Notion AI was integrated as a built-in part of the workspace, this assistance can be used directly inside wiki pages, tasks and databases, without opening a separate tool. On Business and Enterprise plans, features like automatic meeting notes and workspace-wide search are included by default, while other plans only get limited trial access.
Exactly how a wiki like this can later be used as an onboarding tool for new hires is the topic of part 2 of this series, for now it’s enough to set up the wiki structure so it stays easy to expand later.
Setting up permissions and sharing correctly
Without a clear permissions setup, even Notion eventually becomes messy. The good news: the controls are far more granular than a shared Google Drive folder.
Every teamspace can be configured on creation with a name, description, icon and individual permissions. As the owner of a teamspace, you can then:
- Add or remove members
- Assign additional people as owners
- Duplicate the entire teamspace, for example as a template for a new team
- Leave your own membership if the area is no longer relevant
Inviting new team members to the entire workspace follows a fixed path: Settings → Workspace → Members → “Add members”, followed by entering the email addresses. This step should only happen after the basic structure of teamspaces, wiki and core databases is already in place, so new members find an organized workspace rather than an empty one.
For individual pages, the rule is: anyone sharing a page outside a teamspace with specific people controls visibility via the “Share” button in the top right. Here it pays to follow a simple rule of thumb: private by default, shared deliberately, not the other way around.
Practical use case: building a project tracking board in 7 steps
The best way into Notion for teams isn’t a sprawling wiki project, it’s a small, working project board. It immediately shows the added value over Excel and Slack.
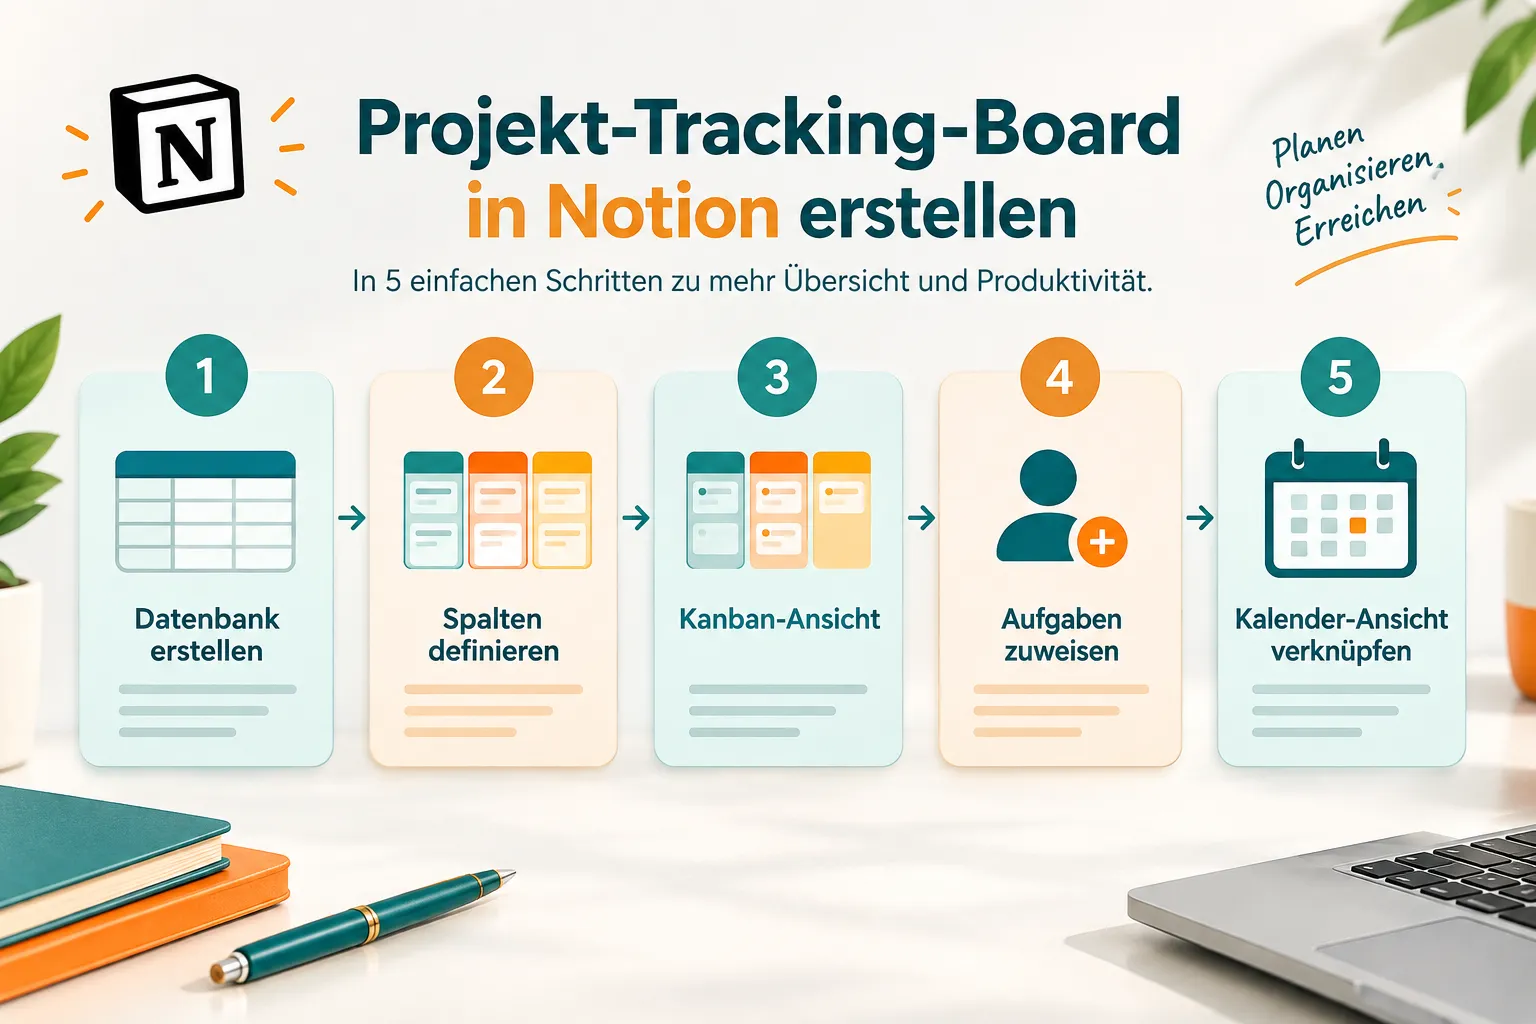
Step 1: Choose a teamspace
Build the board inside the relevant department teamspace, not the “General” area.
Step 2: Create a new database
Use the plus icon to create a new database page and name it “Projects” or “Tasks”.
Step 3: Define columns
Basic setup for a tracking board:
- Task (title)
- Status (select: Open, In progress, Review, Done)
- Owner (person)
- Due date (date)
- Priority (select: Low, Medium, High)
Step 4: Add a Kanban view
Create a second view as a board and group it by the status column. This immediately gives you a visual task board similar to a Trello board, only directly linked to your documentation.
Step 5: Add a calendar view
Add a third view as a calendar, sorted by due date, to get an overview of deadlines.
Step 6: Enter your first tasks
Instead of copying over old spreadsheet rows, it’s worth starting with five to ten real, current tasks.
Step 7: Invite the team and clarify roles
Invite team members through member management, assign ownership per task and briefly explain which view is used for what.
Anyone who also wants to try automation will find so-called Custom Agents in current Notion versions, which can execute tasks on boards directly and be included like team members via @-mentions. For getting started, however, the manual board described above is entirely sufficient.
Conclusion and next steps
The switch from Google Docs, Excel and Slack to Notion for teams works best in small, manageable steps: first a lean teamspace structure with a maximum of three default areas, then a simple wiki for central documentation, followed by the first databases with table, Kanban and calendar views. A working project board matters more than a perfect wiki, Notion thrives on real usage, not a flawless structure on day one.
The recommended next step: create a teamspace, rebuild the project tracking board from this article, and use it in parallel with your current tool for a week before finally retiring Slack and Excel.
Part 2 of this series shows how the wiki set up here can be used specifically as a team wiki for onboarding new hires, from the first welcome page to a structured onboarding checklist.
References
[1] How To Set Up Your Notion Workspace For Your Team – https://www.notion.com/help/guides/how-to-set-up-your-notion-workspace-for-your-team
[2] Intro To Teamspaces – https://www.notion.com/help/intro-to-teamspaces
[3] Teams Organize Track Manage Work In Notion – https://www.notion.com/help/guides/teams-organize-track-manage-work-in-notion
[5] Teamspaces Give Teams Home For Important Work – https://www.notion.com/help/guides/teamspaces-give-teams-home-for-important-work
[6] Intro To Workspaces – https://www.notion.com/help/intro-to-workspaces
[8] Team Workspace – https://www.notion.com/templates/team-workspace
[9] 2026 07 01 – https://www.notion.com/releases/2026-07-01
[10] Browse Join And Create Teamspaces – https://www.notion.com/help/browse-join-and-create-teamspaces
Frequently Asked Questions
What is Notion and why do teams use it?
Notion combines pages, databases, and light automation in one workspace so documentation, tasks, and project status live in a single place instead of being scattered across tools like Google Docs, Excel, and Slack.
What is a Teamspace in Notion?
A Teamspace works like a mini-workspace inside the main workspace, with its own members and permissions. Notion recommends no more than three default Teamspaces to keep navigation manageable.
What's the difference between Table, Kanban, and Calendar views?
All three views display the same underlying data differently: Table like a spreadsheet, Kanban as cards grouped by status, and Calendar by date, and updating one automatically updates the others.
How do you build a simple project tracking board in Notion?
In seven steps: pick the right Teamspace, create a new database, define columns like status and due date, add Kanban and Calendar views, enter a handful of real tasks, and invite the team.